2 Step Basement Tuning
The “Basement Tuning”, invented by Brian White, will result in a fairly good tune in a very short time and does not need a lot of space to fly. But first of all, although it is called „basement tuning“, it does not have to be done in the basement. You theoretically can, because the test-flights do neither require a lot of space nor very good piloting skill. But for people that do not feel comfortable flying indoors, don’t. Use the backyard, for example.
The important part is, there is no need to go out, flying somewhere on the field anymore, doing snappy moves for several minutes and analyzing them for hours. The evaluation will be done in no time, thanks to a handy analysis tool which is (will soon be) part of the PID Toolbox, also created by Brian.
Anleitung (Deutsch/German)
Instructions (English)
Prerequisites
Betaflight (it will work with other firmware as well)
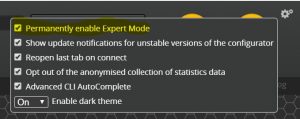
Set the Betaflight Configurator into Expert Mode to get the full slider range. Also set the checkbox „Reopen last tab“ to speed up the tuning.
PIDtoolbox (Log Analysis Tool)
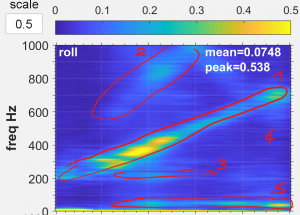
Filter Tuning
Settings
- Log Rate at 1khz is sufficient
- No Debug mode is required, but use gyro_scaled just in case you wanna look at filters too
- Temporarily set FF to the minimum and FF transition to 1 for the tests
- Temporarily switch off Dmin
- Set Master Slider to 1, or lower depending on your setup. Especially, you may want to reduce I because some quads will require less I than Betaflight defaults
- Just for the tests, you may turn TPA off
Required Maneuvers for Basement Tuning
Indoor flying (ie. “Basement”, bedroom or whatever) with some small pitch, roll and yaw (step 1) movements all together for about 20 seconds. For example, do a move with pitch, roll and yaw altogether and then stabilize the copter. But don’t just hover. However, there are no flips, rolls, yaw turns, or any snappy movements at high rates, required. Just easy, slow and safe moving around. Basically, just fly around and try not to hit the walls [citation Brian White]
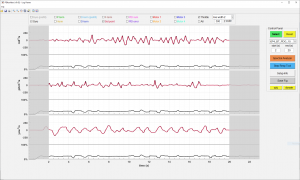
PID Toolbox Basement Tuning Moves
Keep in mind that with a “bad” tune, which we kind of provoke in some of the test scenarios, the quad will be harder to control! Also check for hot motors. Burning a motor is quite unlikely for a 15-20 flight, even with extreme slider positions, but possible.
Step 1 – PD Gain
Most important, stop the test series, when you start hearing osciallations or when the motors get hot. Then you are already above the optimal value and you don’t need to go any further up with the sliders. It does not matter if there are not all eight test flights.
- Leave PD Balance at default 1.0 (unless you already suspect some specific setting to be optimal)
- Set the PD Gain to the minimum (or 0.6 if you want the steps to end at 2,0)
- Do the described maneuvers
- Save the logfile and name it accordingly (If not, you need to strictly keep the order)
- Move the PD Gain slider 2 notches to the right.
- Repeat until you have the entire Slider range covered (6-8 tests should be enough from ~0.6 to ~1.8 in 0.2step intervals).
- Now analyze the logs to find the optimal PD Gain. You are looking for the point with lowes overshoot and where latency does not improve (lower numbers are good) significantly anymore. If you see oscillations, PD Gain (D) ist already too high and/or filtering is not sufficient.
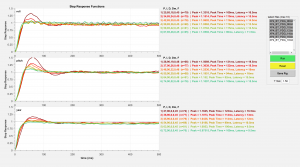
PID Toolbox Basement Tuning BD Gain Evaluation
Step 2 – PD Balance, for fine tuning
- Set the PD Gain to the optimal value found in Step 1
- Set the PD Balance to the minimum (0.5 or 0.6)
- Do the described maneuvers. You can skip the yaw turns, as there is no D in yaw. You may also skip the one settings, which you already covered in Step 1 (normally the PD Balance Slider at 1.0)
- Save the logfile and name it accordingly (If not, you need to strictly keep the order)
- Move the PD Balance slider 2 notches to the right.
- Repeat until you have the entire Slider range covered.
- Now analyze the logs to find the optimal PD Balance.
Asymmetric frame design
Asymmetric frame design may require different slider positions for the axes. Therefore, it’s a little more work to do. At least as long the Betaflight Configurator does not have separate sliders for each axis. Set PD Gain to the optimal value found in Step 1 for roll. Vary the PD Balance slider and note down the D values for each slider position.
Then set PD Gain to the optimal value found on the pitch axis. Vary the PD Balance slider and note down the D values for each slider position. Now, set P manually to the value found in Step 1 for each axes. The slider will disappear. For the test, set the D to the values noted down. Make a test-flight for each D you noted before.
Finetuning
This will be covered in another article, as the two steps of basement tuning will result in a fairly good tune, which is sufficient for most applications.
Filter Readjustment
Because D will probably be different from where it was at the beginning of the process, it is highly recommended to adjust the filter setting accordingly.